Blog :: USB-PD Is Pretty Cool
Packed lunches are a great way to save money, but being limited to foods palatable at room temperature (or colder) can be a little discouraging. In most American workplaces, a microwave oven is readily available in the breakroom, making it easy to reheat a home-cooked meal. However, after leaving a desk-bound white-collar job for one that often takes me into the field, that's only occasionally an option. So I DIY'd a device for warming up food that's portable and usable in almost any situation.
As any good engineer knows, it's important to evaluate existing solutions before building your own. Let's go through a few typical situations I might be in during a mealtime:
- It's a workday for me and I'm not at my typical worksite: likely, I'm in the field.
- I'm out exploring the city, or meeting up at a venue with friends.
- I've taken a break to charge my car while driving across the country.
- I'm waiting for my train at an Amtrak station.
- I am currently riding on a train.
- I'm waiting for my flight at an airport.
- I am currently on an airplane.
What I've been doing is using what's marketed as a "portable oven." Mine is the (now-discontinued) SabotHeat. It's the heating element of a slow cooker, placed in an insulated lunchbox, with a standard NEMA 1-15P connector to be plugged into a wall outlet. It works well, but it can take as long as two hours to warm a portion of food to my preferred temperature. In the case of (1.), (2.), (4.), and (6.), I'm moving around enough that I can't sit by an outlet for that long. In the case of (3.), and (7.), there likely isn't even an outlet available. (5.) is the sweet spot: a train ride from Washington to Boston usually exceeds 7 hours and there's almost always a working 120V outlet available.
Another approach, albeit far more unhinged, is bringing a pot and a ceramic hot plate (the kind that you cook on). I have actually done this more than once, dehydrating a portion of soup and, while waiting at an airport, bringing a pot of water to a boil to re-constitute the dehydrated soup. It produces hot food in a much shorter amount of time, but then you have to deal with a hot plate that needs to cool down before you can put it back in your bag. And you still need an outlet. It's impractical, even if somewhat entertaining due to how absurd it is to be cooking up a small pot of soup at the airport.
Despite the impracticality, there is an upside to this approach: dehydrated soup isn't a liquid, so it goes through security just fine.
What I'd like, then, is something between the SabotHeat and the hot plate that can be powered by a battery. There are portable batteries with a built-in inverter and NEMA 5-15 socket, but they're heavy and bulky. What I really want is a warming device that can be powered by the readily-available slim USB-PD batteries you can buy to charge your laptop.
This post will probably make you cringe if you're moderately experienced in circuit design or 3D printing.
The Simplest Circuit
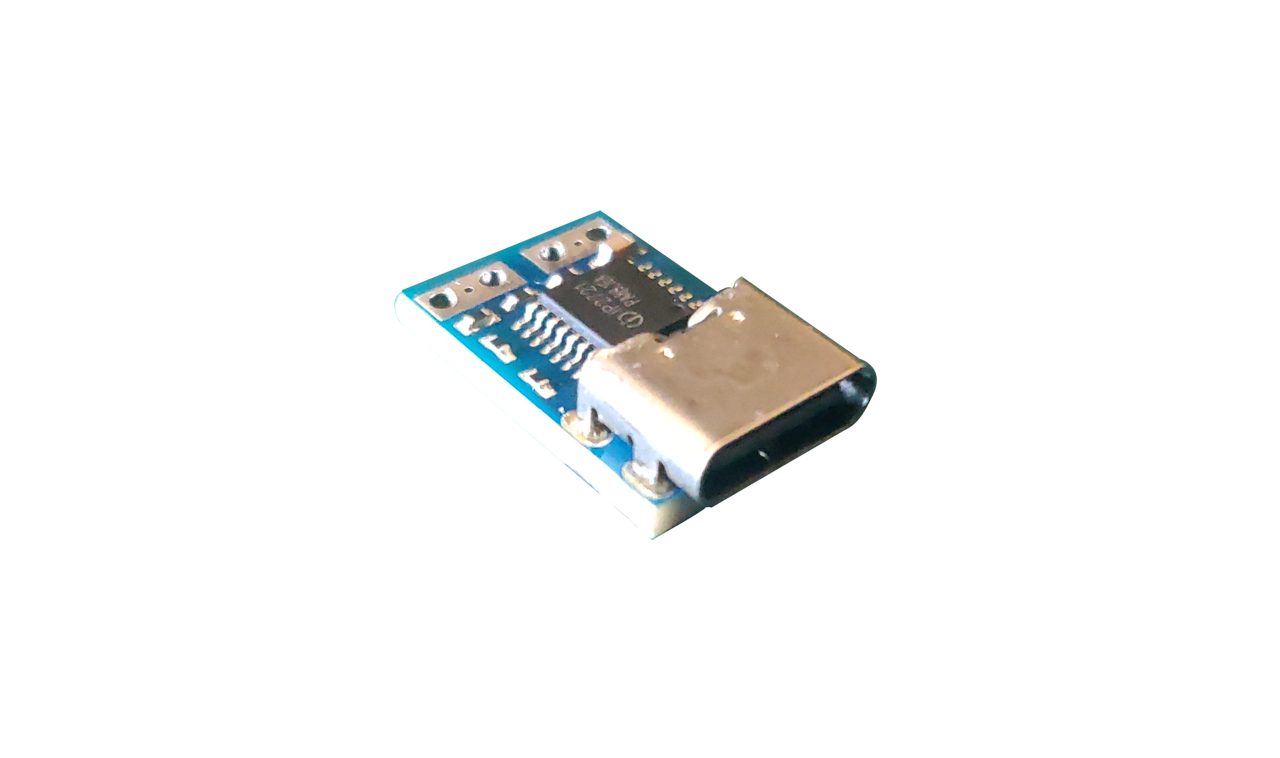
The extent of my electronics experience is high school physics, but I basically know what I want. I need a heating element, and some way of driving current through it. For my first prototype, I used four resistive heating elements (12V, 20W) in parallel because my understanding of parallel circuits is that the current is equally distributed across all the elements. I.e., if my input is about 6.7A, I'll be driving about 1.7A through each of the heating elements, equivalent to 20W, maxing them out. For inducing a current through them, I used a USB-C Power Delivery (USB-PD) trigger module.
If you aren't familiar with USB-PD, it's a standard for delivering >7.5W over USB. It's why modern laptops and phones are able to charge so quickly over a USB-C connection. Both devices (charger and device being charged) need to support it, but if they do, they can negotiate a higher voltage/current over the data line based on what each support and what the cable is capable of carrying. PD 1.0 allows the following voltage/current pairs. (From Wikipedia, the free encyclopedia.)
| Profile | +5 V | +12 V | +20 V |
|---|---|---|---|
| 0 | Reserved | ||
| 1 | 3.0 A, 15 W | — | — |
| 2 | 1.5 A, 18 W | ||
| 3 | 3.0 A, 36 W | ||
| 4 | 3.0 A, 60 W | ||
| 5 | 5.0 A, 60 W | 5.0 A, 100 W | |
What the trigger module does is handle the negotiation and give you, effectively, a constant voltage source. Connect it to a load, and you induce a current through your circuit. Perfect. Warming something up takes a lot of energy, so we'll opt for 20V, being the only voltage in the standard capable of carrying 100W. The problem is that the resistive heating elements are 12V. Fortunately we can use a buck converter to efficiently convert the voltage. In retrospect, a linear regulator would have been fine because we would could have recycled the waste heat for warming the food, but the benefit of the buck converter is that you can just buy one and it's extremely simple to use. I was able to treat it as a black box that takes in 20V and puts out 12V.
The reason I think these trigger modules are so great for the average tinkerer is that they're an incredibly inexpensive (< $0.50) and compact power source for just about any project you might want to make1, and USB-C is incredibly ubiquitous these days. You're probably reading this on a USB-C power source.
The heating element and power source are all we really need, but I also threw in a temperature controller module for fun. It definitely wasn't necessary; due to the relatively low current draw, I wasn't expecting to have any desire to cap the temperature for the resistive heating elements, but you never know. Plus, it has a nice display to tell me whether or not the device is actually working and making my food hot. It's another simple black box, effectively a switch (passing through the current) that's controlled by a temperature probe.
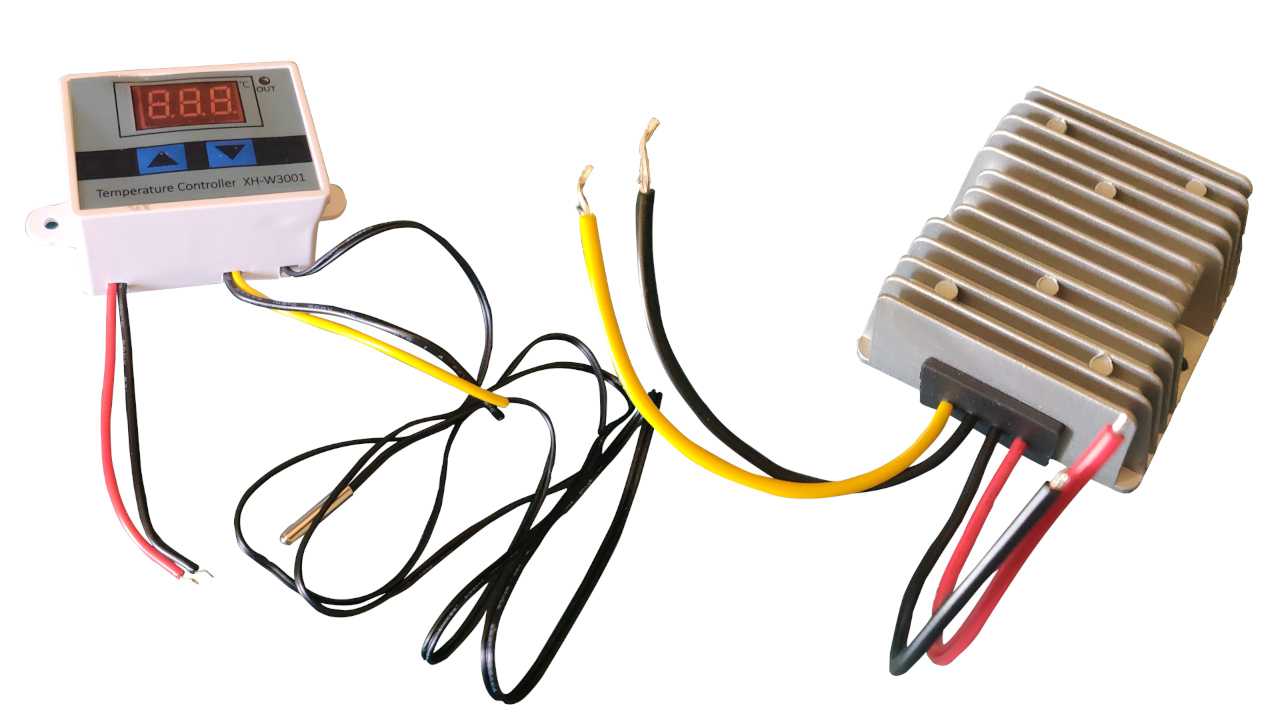
With all that, here's the circuit.

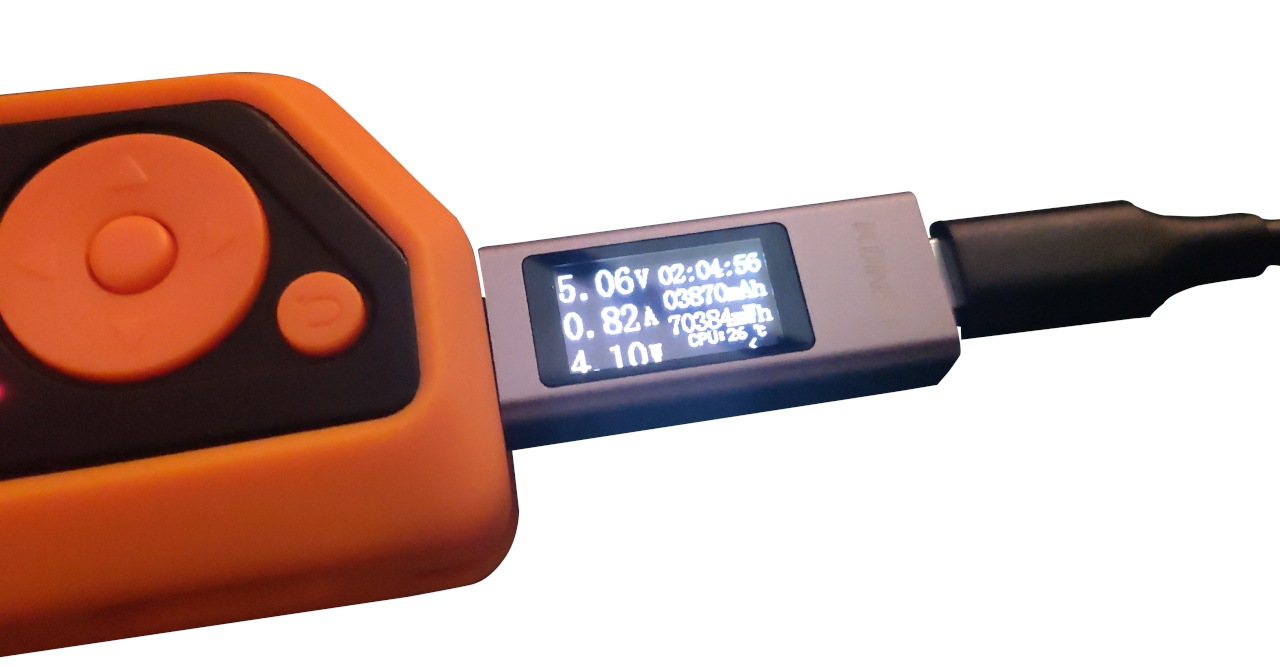
One tool I purchased specifically for this project is a USB-C ammeter. For about $10, I get a real-time display on the voltage, current, and power draw passing through it. Very useful for this project, particularly when I accidentally plugged one of the prototypes into a port that only supported 12V. Much easier than holding multimeter test leads onto relatively small solder pads.
First Prototype
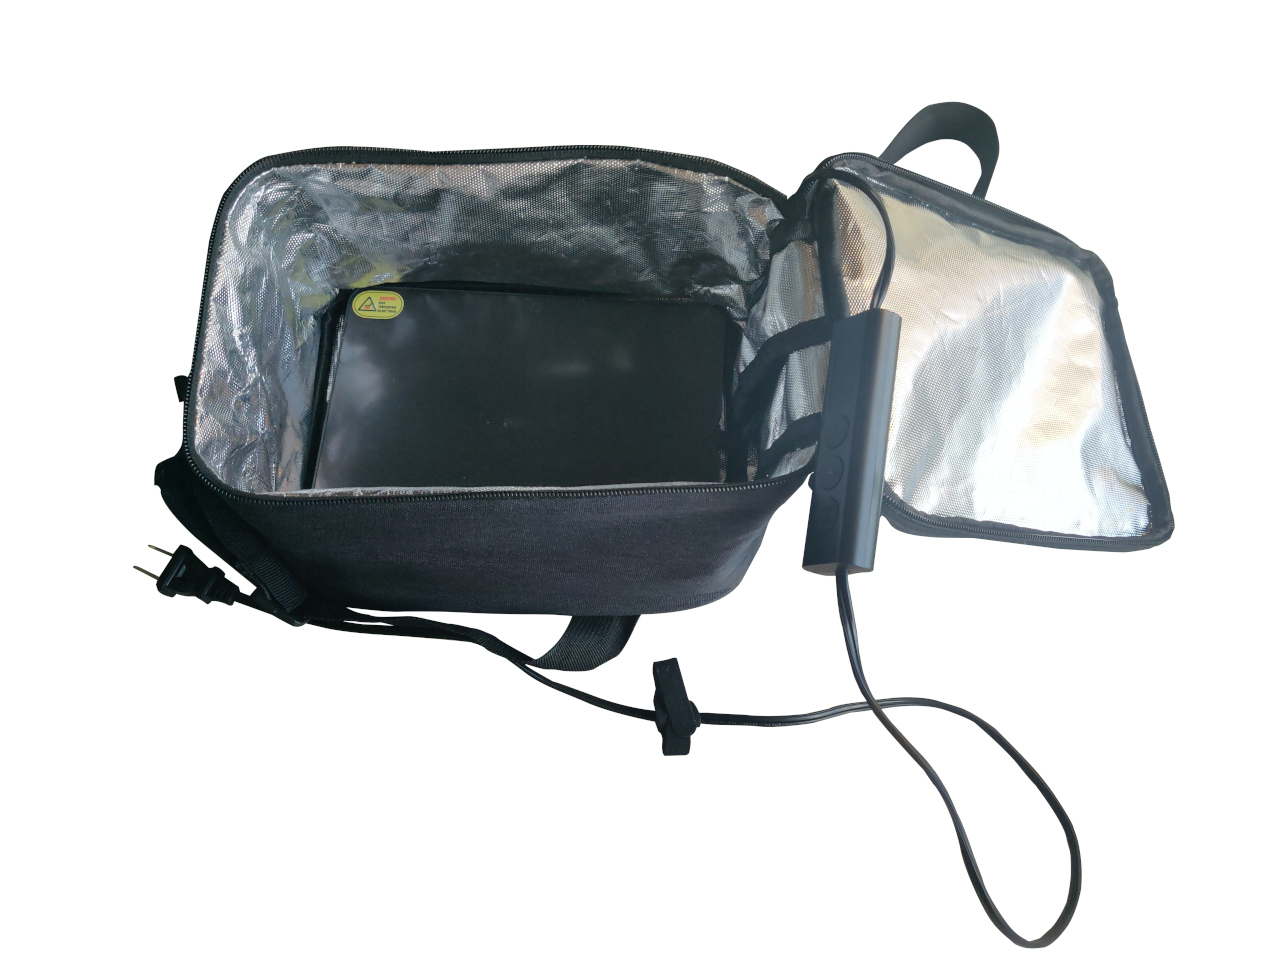
I had an (irrational) fear of the heating elements getting so hot that they would melt or burn the containing bag, so I wanted to put something down as an insulator. I had a silicone baking sheet that I received as a "free gift" when I ordered some artificial flavorings a couple months ago. It's been sitting on a shelf ever since, so it will probably get more use being repurposed for this project than its intended purpose. If it's designed to withstand oven heats, it should do fine in direct contact with some heating elements. So I folded it over, put it in the lunch bag that came with the SabotHeat, and wired everything up.
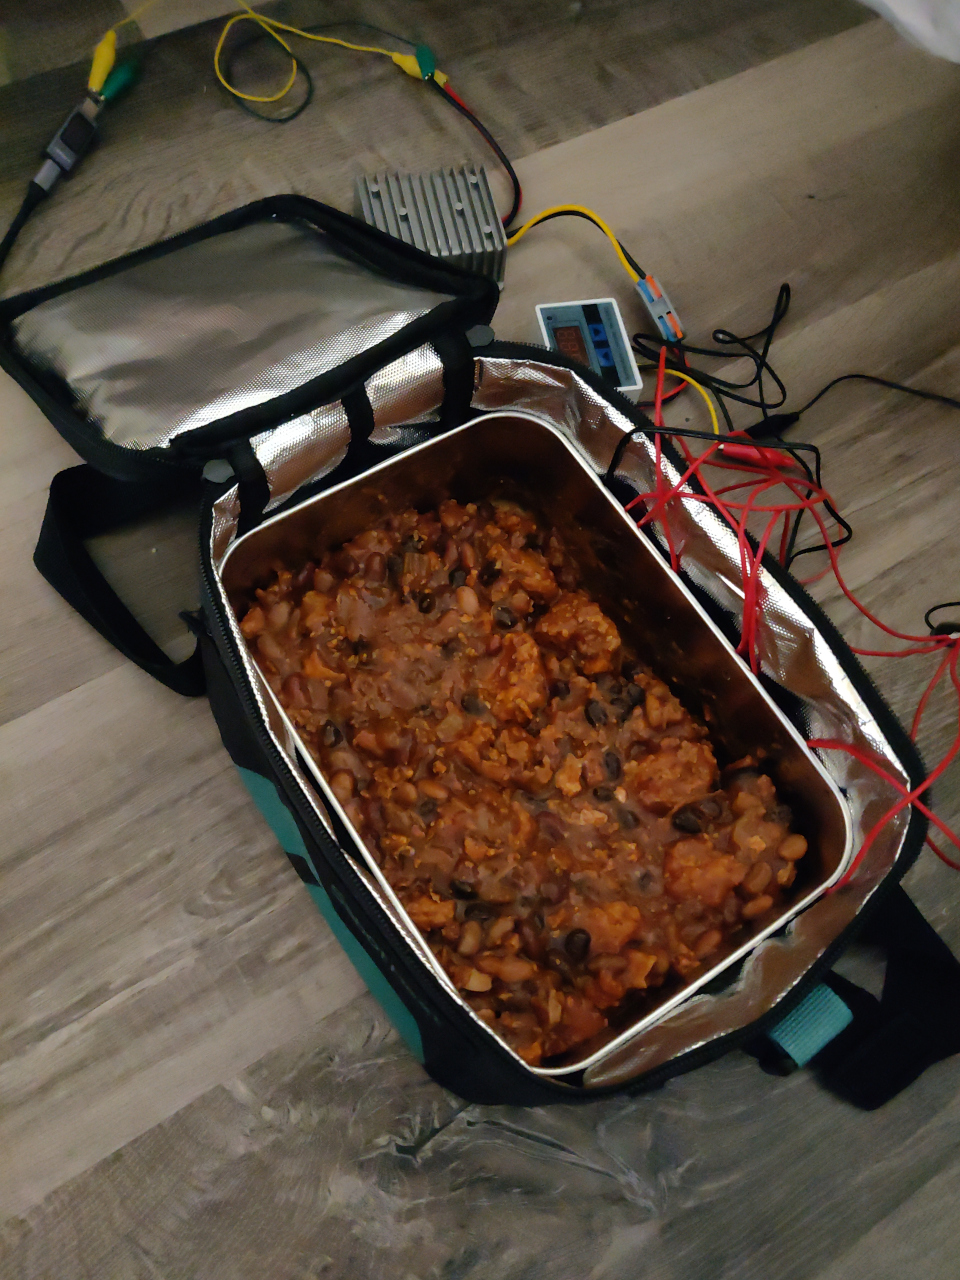
The dish here is stainless steel. One thing I'd learned with the stock SabotHeat element is that you have to consider the thermal conductivity (watt per meter-kelvin) of your dish. Effectively: how good your dish is at conducting heat. I started with Pyrex, which has a okay thermal conductivity, but stainless is much better. Another consideration is the thermal conductivity of your food. Chili (especially when it's a bit thin) is a great test bed because it's liquid, and heat generally transfers through that well. A dish that's made up of a couple solid components, like a cup of rice, some refried beans, some vegetables, and some chicken won't warm up as well if you just put the dish on the heating element. That's relatively easy to work around by adding a little bit of water to the bottom of the dish, because the water turns into steam, which is a good medium for transferring heat to food (as evidenced by steaming being a common method for cooking vegetables). Anyway, that's a massive aside to say that chili in a stainless dish was a good representation of the "best case scenario".
And it passed with flying colors. There was steam coming off of it when I pulled it. I threw some fries and cheese on top and it made for a fulfilling supper. That said, the device ran for nearly 2 hours at 80W, and the temperature rose very slowly. It started at 18°C and ended at about 70°C. So I started wondering if I could do better.
Second Prototype
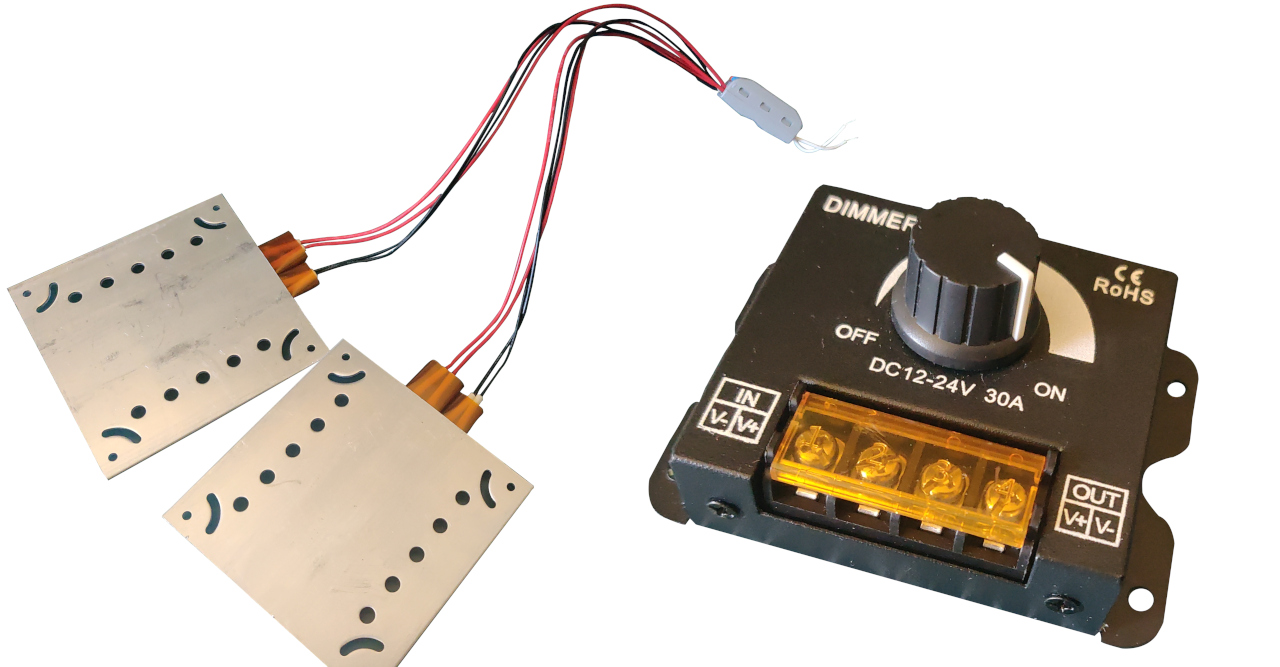
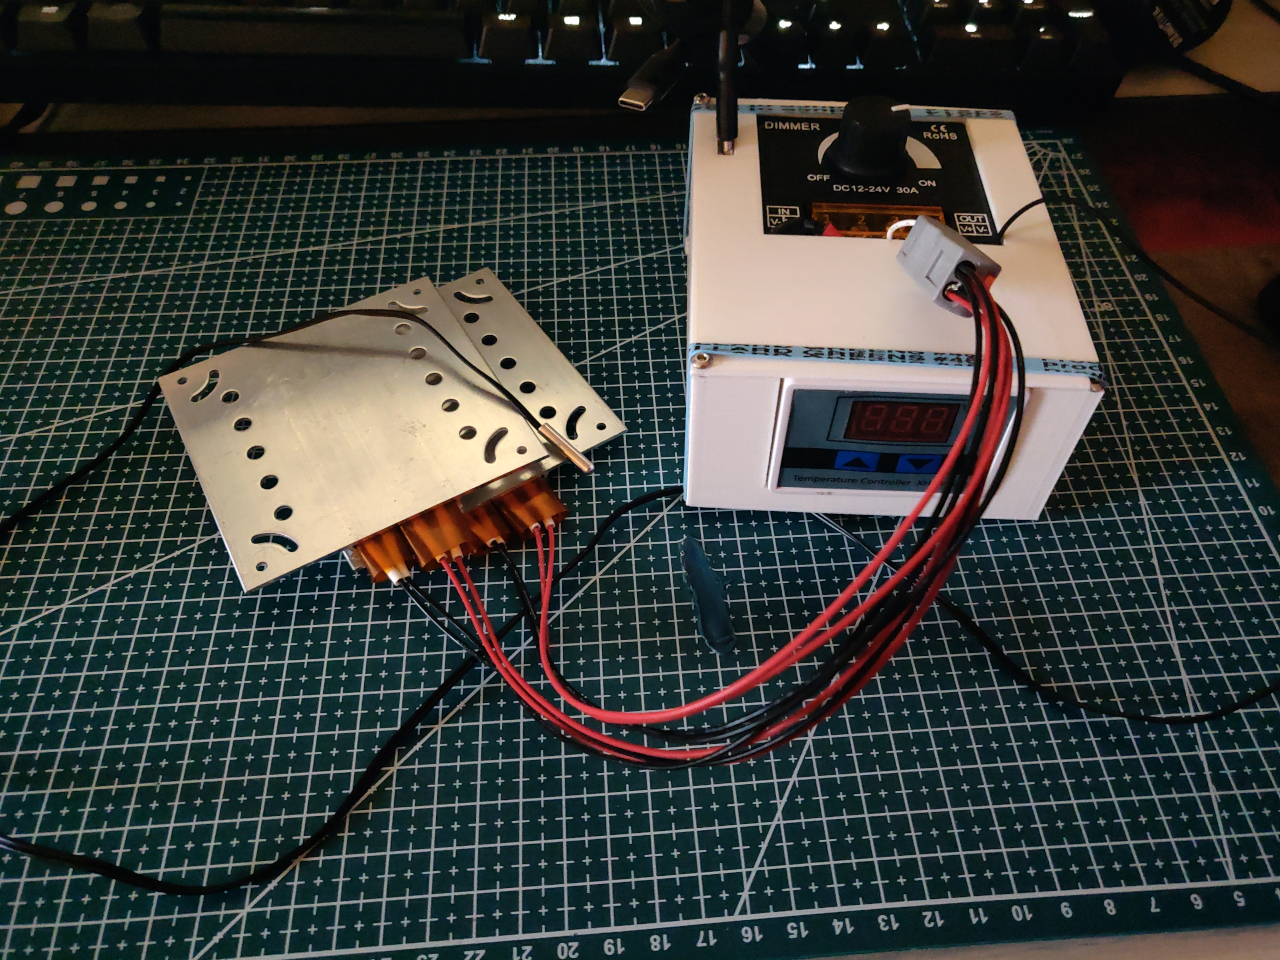
The resistive heating elements worked good enough, but I did have some positive-temperature-coefficient (PTC) heating elements handy of various voltages and temperatures, and figured it would be worth experimenting. I had two that were built into aluminum plates, so I figured I would give it a shot with those instead. They were significantly better than the resistive heating elements. The surface temperature of the heating elements rose from 25°C to 70°C in 15 minutes.
Of course, I don't want to burn my food, and if I rely on the temperature controller module alone it's going to be constantly cycling on and off. Fortunately, I had a LED dimmer module handy that I could use to drop the voltage across the heating elements. Yet another black box which, in a massively oversimplified mental model of the circuit (that's probably incorrect) acts as a variable voltage divider, but in practice probably does more under the hood than a plain old potentiometer.
A few days ago I had a medical evaluation for work early in the morning in Washington, plans to spend the rest of the day with some friends downtown, and one serving of chili left. A perfect opportunity to test out the device with the PTC elements. It worked great until the one battery I brought with me died about 40 minutes in.
Did I forget to charge it? My batteries are labeled 20,000 mAh, so my thinking was that if I'm drawing 4 amps for the heating elements, I should to be able to run the device for 5 hours. After doing a little research, though, I learned that the mAh rating for these sorts of power banks is done at the nominal voltage of a single lithium ion cell (3.7v), not at the output voltage. The watt-hour (Wh) is a more useful measurement, which for this battery, is 74 Wh. Operating at 20V, (74 wH * 1000) / 20V gives us 3,700 mAh, meaning I can run 4 amps for a touch under an hour. So I'll need a second battery in practice, which is inconvenient, but two is just a touch over 1.5 lbs and it's easy to find space for them in my backpack, so it's not terrible.
You're Really Going to Travel With That?
If the American Transportation Security Administration (TSA) is willing to peculate my lawfully-owned lock picks under the guise that sharp things, however small, could be dangerous, they'll almost certainly blow a gasket seeing me try to travel with a jumble of wires and a LCD display reminiscent of al-Qaeda's watch of choice. So let's build a nice enclosure for all of the electronic components. I'll gladly take the excuse to break out the 3D printer I haven't used in ages.
I'm a CAD neophyte, but I just needed a box to put the components in, which wasn't too hard to put together in FreeCAD. Measurements for my first attempt were way off, so for the second version of the design I drew the model out on paper and placed the components on it to make sure they would fit, which worked well. I had some M3 screws handy so I added holes to join the top with the rest of the box.

End Product
The Ender 3 that's been sitting in storage for over a year now managed to build it just fine, at least after some maintenance to replace one of the pneumatic couplers after it catastrophically failed. I should probably replace the springs, too, since the bed isn't staying level, but that's a project for another day.
Great, that looks even more like a bomb than my bundle of wires. At least it's easier to manage, so I can keep it out of sight.
Bill of Materials
I bought some of these components before increased tariffs, so this would probably be a few dollars more expensive if you bought everything today.
| 2x PTC Heater Element | $8.54 |
|---|---|
| 30A DC 12V-24V LED Brightness Regulator | $7.41 |
| 10A 120W Step Down to DC 12V Buck Converter | $14.99 |
| PDC004-PD 20V PD Decoy Module | $0.90 |
| Temperature Controller Module | $4.99 |
| Total | $36.83 |
I was able to obtain a few 100W batteries for $35 a piece. If you count those, with the cost of the dish, the heat shrink tubing, the solder, etc. the effective price probably comes to much more than $37. But I had fun, I suppose, which I think is the part that matters.
—
Footnotes:
Random anecdote in support of my argument: I replaced the DC barrel jack in a Baofeng charger with one for soldering practice, and now it's easier to bring it with me when I'm traveling since I no longer need an additional wall-wart. I just needed to connect to two solder pads and I had an appropriate voltage source for the charging circuit.
Comments (0)
Leave a Comment